
No, you do not need to charge your Nest Thermostat before installing. It charges through your HVAC system.
The Nest Thermostat is a smart home device that optimizes your home’s heating and cooling. It learns your schedule and preferences, adjusting the temperature automatically. This helps save energy and reduces utility bills. Installation is straightforward and user-friendly, designed for homeowners without professional assistance.
The thermostat connects to your HVAC system, which charges it, eliminating the need for pre-installation charging. With easy-to-follow instructions and a sleek design, the Nest Thermostat enhances both your home’s comfort and efficiency. Whether you’re tech-savvy or a beginner, setting it up is hassle-free, making it a smart addition to any modern home.
Introduction To Nest Thermostat
The Nest Thermostat is a popular smart device. It helps control your home’s temperature. This can save energy and money. It also learns your schedule. This means it can adjust settings automatically. This makes your home comfortable and efficient.
Smart thermostats offer many benefits. They are easy to use and can be controlled from your phone. This means you can change the temperature even when you are not home. Energy savings are a big plus. They help you reduce your energy bills. Smart thermostats also provide detailed energy reports. These reports show how much energy you use and how to save more.
The Nest Thermostat has many great features. Here are some of the key ones:
- Auto-Schedule: Learns your habits and creates a schedule.
- Remote Control: Adjust settings from your smartphone.
- Energy History: See how much energy you use.
- Home/Away Assist: Automatically adjusts temperature when you leave.
- Farsight: Lights up to show the temperature when you walk by.
Pre-installation Checklist
Make sure you have all the necessary tools. You will need a screwdriver and a drill. Also, have a level to ensure proper alignment. A pencil for marking holes is helpful. Don’t forget to have wire strippers ready. These tools will make installation easier.
Safety is very important. Turn off power at the circuit breaker. This prevents electric shock. Wear protective gloves for added safety. Make sure children are not near the work area. Double-check that the power is off before starting.
The Charging Question
Nest Thermostat uses a built-in battery. It keeps the device running smoothly. The battery can last for several hours. This ensures the thermostat works during power outages. Charging is done through the HVAC system wiring. This means the thermostat charges while in use.
Nest Thermostat may need charging before installation. New devices often come with enough charge. Check the battery level before starting. Charging can be done using a USB cable. Plug it into the charging port on the back. Wait until the battery is full. This ensures smooth setup and operation.
Step-by-step Installation Guide
Your Nest Thermostat box includes the thermostat, a base, and a screwdriver. Make sure you have everything. Inspect each item carefully. Check for any damage or missing parts. Read the instruction manual provided. It will help you understand the steps better. Gather all necessary tools before starting the installation.
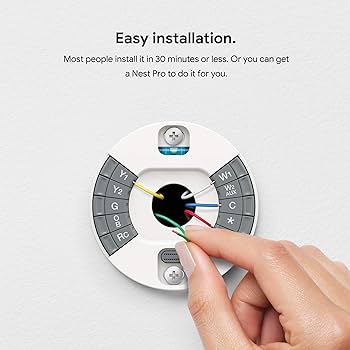
Turn off the power to your HVAC system. Remove the old thermostat from the wall. Mount the Nest base using the screws provided. Connect the wires to the correct terminals. Use the Nest app to guide you through wiring. Make sure the wires are secure. Double-check your connections before proceeding.
Once wired, attach the Nest Thermostat to the base. Turn the power back on. The thermostat will power up. Follow the on-screen instructions. Connect to your Wi-Fi network. Configure settings like language, location, and temperature preferences. Calibration will take a few minutes. Your Nest Thermostat is now ready to use.
Activating Your Nest Thermostat
Your Nest Thermostat needs to connect to Wi-Fi. This helps it get updates and weather info. Make sure your Wi-Fi signal is strong. It will help the thermostat work better. Choose your Wi-Fi network on the screen. Enter your password carefully. A good connection is important.
Download the Nest App on your phone. It is available on both iOS and Android. Open the app and create an account. Follow the steps to add your thermostat. The app will guide you through the setup. Make sure you complete each step. This helps your thermostat work well.
Credit: m.youtube.com
Optimizing Your Nest Thermostat
It’s important to help your Nest thermostat learn your preferences. Use the device regularly for a week. Adjust the temperature as you like it. The Nest will remember your choices. Soon, it will start making adjustments on its own. This makes your home comfortable without effort.
Set your thermostat to eco mode when you are away. This saves energy and lowers your bills. Keep your temperature settings moderate. Avoid extreme highs and lows. This helps in saving energy. Regular maintenance of your HVAC system is crucial. Clean filters and vents improve efficiency.
Troubleshooting Common Issues
Your Nest Thermostat may struggle to connect to Wi-Fi. First, ensure your Wi-Fi network is working. Then, check if other devices can connect. Move the thermostat closer to the router. If it connects, distance may be the issue. Reduce interference by moving other electronics away. Resetting the router can also help. Always keep your firmware updated for best performance.
The Nest Thermostat has a built-in battery. Sometimes, the battery doesn’t charge properly. Ensure the thermostat is properly wired. Incorrect wiring can prevent charging. Use a USB cable to charge it if needed. Check the battery level in the settings. If it stays low, the thermostat might need a replacement.
Credit: www.amazon.com
Faqs And Additional Resources
Check the warranty before installing the Nest Thermostat. The warranty covers defects and malfunctions. Contact customer support for any issues. They are available via phone, email, or chat. Keep your receipt for warranty claims. Register your product online for quicker service. Support is available in multiple languages. Visit the official website for detailed information.
Explore the official blog for more tips. Watch tutorial videos for step-by-step instructions. Visit the community forum for user experiences. Read user reviews for real-life feedback. Check out installation guides available online. Subscribe to the newsletter for updates. Follow on social media for the latest news. Find links to these resources on the official website.
Credit: www.reddit.com
Frequently Asked Questions
Does A New Nest Thermostat Need To Be Charged?
Yes, a new Nest thermostat needs to be charged initially. Use the included USB cable for charging.
How Long Does It Take For A Nest Thermostat To Charge?
A Nest thermostat typically takes about half an hour to fully charge. It can vary based on usage.
Are Nest Thermostat Batteries Rechargeable?
Yes, Nest thermostat batteries are rechargeable. They charge automatically through the thermostat’s wiring.
How Do I Setup My Nest For The First Time?
Download the Nest app. Create an account. Follow the in-app instructions to connect your Nest device to Wi-Fi. Mount and install the device. Configure settings as needed.
Conclusion
Charging your Nest Thermostat before installation is essential. It ensures a smooth setup process. Always check the battery level. Proper charging avoids potential issues. Following these steps guarantees optimal performance. Enjoy efficient energy management and a comfortable home environment. Ensure your Nest Thermostat is ready to go!
I’m Robert M. Payne, a passionate enthusiast for turning houses into dream homes. With a knack for DIY projects and a keen eye for design, I’ve dedicated myself to sharing my knowledge and experiences in the realm of home improvement.
As a seasoned homeowner and avid DIYer, I understand the challenges and joys that come with transforming living spaces. Through Myhomemyworld, I aim to inspire and guide fellow homeowners on their journey to creating spaces that reflect both functionality and style.
Cheers to creating spaces that truly feel like home.
Connect with me in facebook