
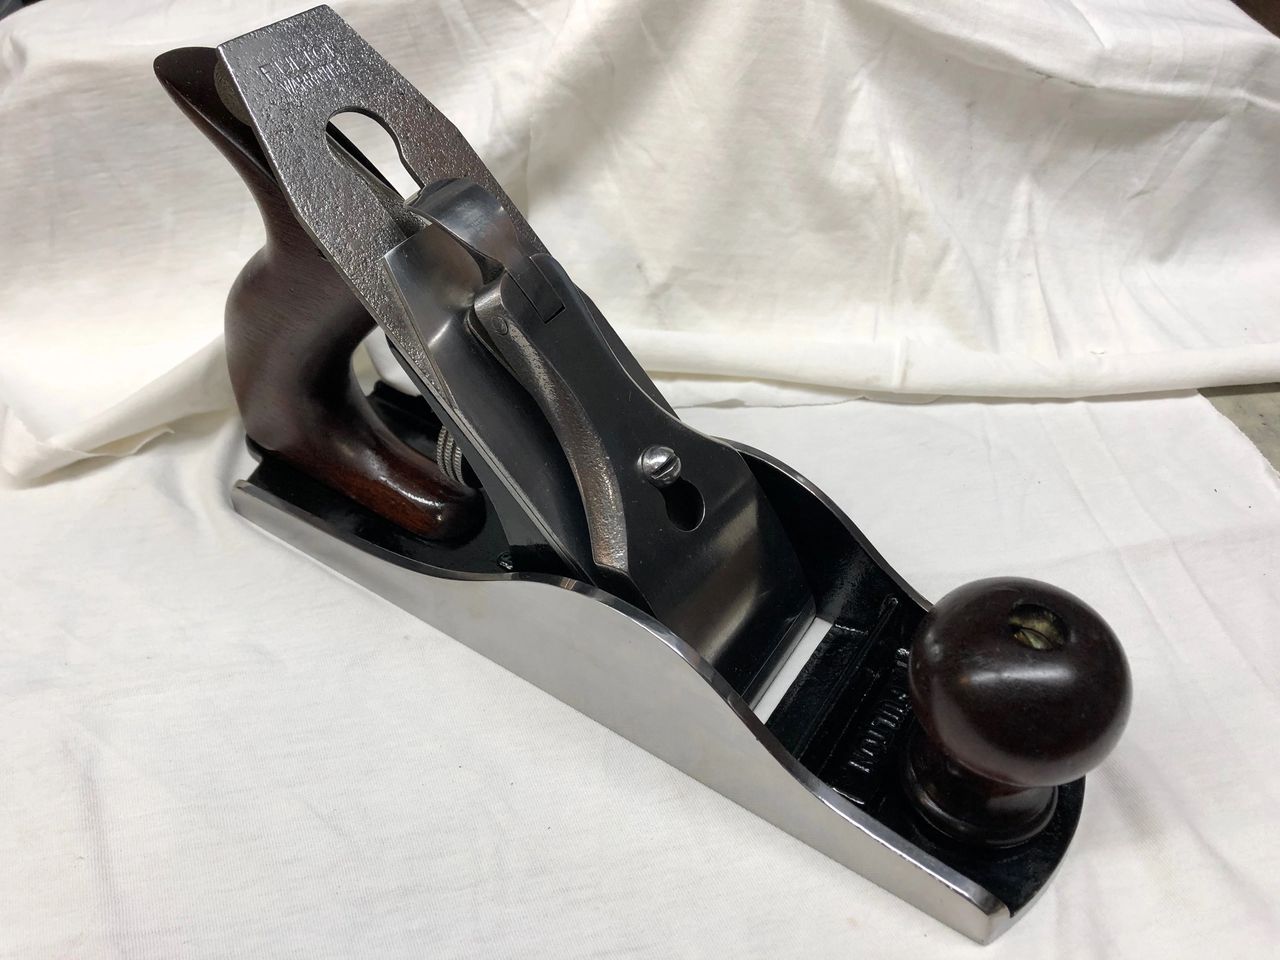
Japanning on a plane refers to the process of applying a durable, glossy black lacquer finish. This technique is often used on metal surfaces for protection and aesthetics.
Japanning originated in the 17th century and has evolved over time. Craftsmen use it to achieve a smooth, hard surface that resists wear and corrosion. This process involves multiple layers of lacquer, each one carefully applied and cured. The result is a high-gloss, black finish that adds both beauty and durability.
Japanning is commonly found on hand tools, especially woodworking planes. It enhances the tool’s appearance while providing a protective coating. Whether restoring vintage tools or creating new ones, japanning remains a popular choice for its lasting benefits.
Introduction To Japanning
Japanning is an ancient technique used to finish metal surfaces. It gives tools like planes a durable, glossy coat. This process involves applying layers of varnish and then baking them. The result is a beautiful, hard-wearing finish that protects the metal. This technique has been used for centuries and is still popular today.
Historical Background
Japanning originated in Japan during the 17th century. It was inspired by traditional Japanese lacquerwork. European craftsmen later adopted this technique. They aimed to mimic the beautiful Japanese finishes. The term “Japanning” itself comes from this cultural exchange. It became especially popular in Europe and America in the 18th and 19th centuries.
During the Industrial Revolution, Japanning saw widespread use. Factories applied it to many metal tools and household items. This process helped protect metal objects from rust and wear. Over time, Japanning became a hallmark of quality craftsmanship.
Purpose And Use
Japanning serves several purposes. The most important is protection. The varnish creates a barrier that shields the metal from moisture. This helps prevent rust and corrosion. Another key purpose is aesthetics. Japanned surfaces have a glossy, black finish that looks elegant. This finish makes tools and objects more visually appealing.
Additionally, Japanning adds durability. The baked varnish is tough and long-lasting. It can withstand daily use and wear. This makes it ideal for tools like planes that experience heavy use. Japanning also makes cleaning easier. Dirt and grime are less likely to stick to the smooth, glossy surface.
Overall, Japanning is a valuable technique for both functional and decorative purposes. Its combination of protection, aesthetics, and durability makes it a preferred choice for many craftsmen and manufacturers.
Credit: aplanelife.us
Materials Used In Japanning
Japanning is an ancient technique. It involves coating surfaces with a durable finish. The materials used have evolved over time. This section explores both traditional and modern ingredients.
Traditional Ingredients
Traditional Japanning used natural materials. The main ingredient was shellac. Shellac comes from the resin of the lac bug. It was mixed with linseed oil. This made the coating smooth and glossy.
Another ingredient was asphaltum. It gave the finish a deep black color. Turpentine was used as a solvent. This helped to thin the mixture. These ingredients made the coating tough and long-lasting.
Modern Alternatives
Today, synthetic resins are often used. They are more consistent than natural shellac. Acrylic polymers are a popular choice. They provide a durable finish. Epoxy resins are also used. They offer excellent adhesion and durability.
Modern Japanning may include urethane. It provides a tough, glossy finish. Acrylic lacquer is another option. It dries quickly and is easy to apply. These modern materials are more reliable and easier to use.
Process Of Japanning
Japanning is a traditional method for coating metal surfaces. It is often used on woodworking planes to protect and beautify. The process involves several steps, each crucial for a durable finish. Let’s explore the key stages of japanning a plane.
Surface Preparation
Surface preparation is the first and most important step. Start by cleaning the plane thoroughly. Remove all dirt, rust, and old paint.
Use a wire brush or sandpaper for stubborn rust spots. Once cleaned, wipe the surface with a damp cloth. Ensure the surface is completely dry before moving to the next step. A clean surface ensures better adhesion of the japanning material.
Application Techniques
Applying the japanning material involves multiple layers. Begin with a base coat. Use a brush or a spray gun for an even layer. Let the base coat dry completely.
After the base coat, add multiple thin layers. Each layer must dry before applying the next. This builds a durable and glossy finish. Use fine sandpaper to smooth out any imperfections between layers.
Finally, bake the coated plane in an oven. The baking process hardens the japanning material. Set the oven at a low temperature to avoid damaging the plane.
| Step | Description |
|---|---|
| 1. Cleaning | Remove dirt, rust, and old paint |
| 2. Drying | Ensure the surface is completely dry |
| 3. Base Coat | Apply an even base coat |
| 4. Layering | Add multiple thin layers |
| 5. Baking | Harden the japanning in an oven |
Following these steps ensures a long-lasting and beautiful finish. The japanning process requires patience but offers rewarding results.
Tools Required For Japanning
Japanning a plane involves restoring the black lacquer finish. To achieve a professional look, you need specific tools. Below, we will cover the essential tools and some optional add-ons that can enhance your project.
Essential Tools
To start Japanning, you need the following tools:
- Paint Stripper: Removes old lacquer efficiently.
- Wire Brushes: Helps in scrubbing off rust and old paint.
- Sandpaper: Smoothens the metal surface. Use various grits for best results.
- Primer: Prepares the surface for new lacquer.
- Japanning Paint: Special lacquer that gives the iconic black finish.
- Brushes: For applying primer and paint evenly.
- Protective Gear: Safety goggles, gloves, and a mask to protect yourself.
Optional Add-ons
These tools are optional but can make the job easier:
- Heat Gun: Speeds up the paint stripping process.
- Dremel Tool: For detailed cleaning and sanding.
- Paint Booth: Provides a controlled environment for painting.
- Turntable: Allows easy access to all sides of the plane.
- Magnifying Glass: Helps in inspecting fine details.
Here is a quick summary in table format for easy reference:
| Essential Tools | Optional Add-ons |
|---|---|
| Paint Stripper | Heat Gun |
| Wire Brushes | Dremel Tool |
| Sandpaper | Paint Booth |
| Primer | Turntable |
| Japanning Paint | Magnifying Glass |
| Brushes | |
| Protective Gear |
Benefits Of Japanning
Japanning, a protective coating, offers many benefits for planes. It enhances durability and aesthetic appeal. Below, we explore these benefits in detail.
Durability
Japanning adds a tough layer to the plane’s surface. This layer resists scratches and prevents rust. It extends the plane’s lifespan significantly.
- Scratch Resistance: Helps keep the surface smooth and intact.
- Rust Prevention: Protects metal parts from corrosion.
These features ensure the plane remains in excellent condition for a long time. Japanning makes maintenance easier and less frequent.
Aesthetic Appeal
Japanning gives the plane a sleek, glossy finish. This finish enhances the plane’s overall visual appeal.
The black lacquer commonly used in Japanning looks elegant. It adds a classic touch to the plane’s design.
- Glossy Surface: Shiny and visually attractive.
- Classic Look: Timeless and sophisticated appearance.
This aesthetic improvement makes Japanning a popular choice among plane enthusiasts. The plane looks not only functional but also beautiful.
Credit: aplanelife.us
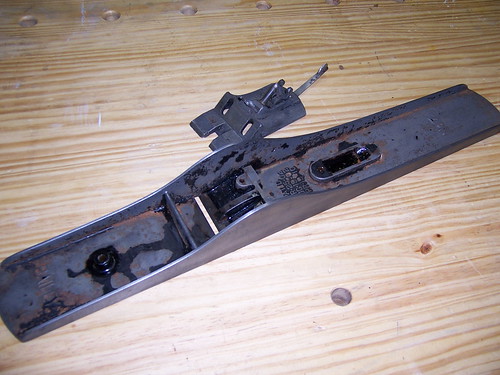
Common Issues And Solutions
Japanning on a plane is a traditional technique for coating and protecting metal surfaces. Over time, this coating can face several issues. This section will explore common problems and provide solutions to keep your plane in top condition.
Flaking And Cracking
Flaking and cracking are common issues in japanning. These problems can weaken the protective layer.
Causes:
- Age and wear
- Exposure to extreme temperatures
- Poor initial application
Solutions:
- Remove loose flakes using a soft brush.
- Sand the cracked area gently.
- Apply a new layer of japanning.
- Let it cure for 24 hours.
Color Fading
Color fading is another issue with japanned planes. The color loses its richness over time.
Causes:
- Sunlight exposure
- Frequent cleaning with harsh chemicals
Solutions:
- Store the plane in a dark place.
- Use mild soap for cleaning.
- Reapply japanning to restore color.
- Polish gently to maintain the shine.
Maintenance Of Japanned Surfaces
Japanning on a plane involves a traditional finish that protects metal surfaces. Maintaining these surfaces ensures the plane’s longevity and performance. Regular upkeep prevents damage and retains the shine of the japanned finish.
Cleaning Tips
Proper cleaning is vital for preserving japanned surfaces. Follow these simple steps:
- Use a soft, dry cloth to remove dust.
- For stubborn dirt, dampen the cloth slightly with water.
- Avoid harsh chemicals; they can damage the finish.
- Dry the surface immediately to prevent water spots.
Repair Techniques
Over time, japanned surfaces might show wear or damage. Basic repair techniques can restore their appearance.
- Assess the damage: Determine if the damage is superficial or deep.
- Clean the area: Remove any debris from the damaged area.
- Use a touch-up kit: These kits contain materials specifically for japanned surfaces.
- Apply touch-up paint: Follow the manufacturer’s instructions for best results.
- Allow to dry: Ensure the repair is fully dry before use.
Maintaining japanned surfaces requires regular cleaning and occasional repairs. These steps help keep your plane looking and functioning its best.
Credit: mvflaim.com
Japanning In Modern Applications
Japanning, a traditional varnishing technique, has found its way into modern applications. This age-old process, originating from Japan, is still relevant today. Let’s explore its modern uses in both industrial and artisanal practices.
Industrial Uses
In the industrial sector, Japanning is used for coating metal surfaces. It provides a tough, shiny, and durable finish. This makes it ideal for protecting tools and machinery. Factories use Japanning to coat metal parts, preventing rust and wear.
Here is a table showcasing common industrial applications:
| Application | Purpose |
|---|---|
| Tools | Rust protection |
| Machinery parts | Durability and wear resistance |
| Automotive components | Enhanced appearance and longevity |
Artisanal Practices
Artisans use Japanning to create beautiful, functional items. This traditional technique is popular among craft enthusiasts. It allows for intricate designs and a unique finish.
Key artisanal applications include:
- Decorative boxes
- Furniture
- Fine art
Artisans often use Japanning to highlight their craftsmanship. They apply it to small decorative items, enhancing their beauty. This makes each piece unique and valuable.
In both industrial and artisanal settings, Japanning offers durability and visual appeal. Its continued use speaks to its effectiveness and timeless charm.
Frequently Asked Questions
What Is The Process Of Japanning?
Japanning involves applying multiple layers of varnish or lacquer to create a durable, glossy finish on wood or metal surfaces.
What Is Japanning On Tools?
Japanning on tools is a durable, glossy black coating. It protects against rust and enhances appearance. Commonly used on vintage hand tools, it involves multiple layers of lacquer.
What Does The Term “japanned” Mean?
Japanned refers to a glossy, black or dark lacquer finish applied to metal or wood. This technique imitates Asian lacquerwork.
What Is A Japanned Finish?
A japanned finish is a glossy, black lacquer coating. It originated in Japan and provides a durable, decorative surface. Commonly used on metal and wood, it enhances appearance and protects against wear.
Conclusion
Japanning on a plane offers durability and a glossy finish. It’s an age-old technique that adds value. Understanding its process can enhance your restoration projects. Explore this method to achieve professional results. With practice, you’ll master japanning and preserve your tools beautifully.
Dive into this craft and elevate your skills.
I’m Robert M. Payne, a passionate enthusiast for turning houses into dream homes. With a knack for DIY projects and a keen eye for design, I’ve dedicated myself to sharing my knowledge and experiences in the realm of home improvement.
As a seasoned homeowner and avid DIYer, I understand the challenges and joys that come with transforming living spaces. Through Myhomemyworld, I aim to inspire and guide fellow homeowners on their journey to creating spaces that reflect both functionality and style.
Cheers to creating spaces that truly feel like home.
Connect with me in facebook